Java ssh tunneling with jsch
|
Overview
Some people are using my Tunnel4J, an easy graphical utility that allows connecting to remote ssh servers and mapping local and remote ports for tunneling. Tunnel4J is based on Jcraft's Jsch, an excellent 100% java library for ssh. As I recently received multiple requests about how to do ssh tunneling in java, I've decided to write this short article as a quickstart.
The whys
Ssh tunneling is used to access network resources located behind a firewall otherwise impossible to reach.
What is explained here can also be achieved by simply using openssh on unix systems or systems for which openssh portings exist, as explained here and here.
Using a 100% pure java library to achieve this guarantees platform independence. Below you can see a typical situation requiring ssh tunneling:
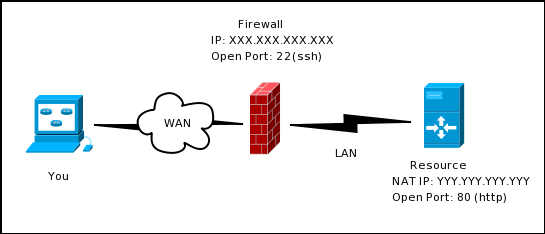
In this case we need to access a web server (port 80) hosted on a machine located behind a firewall and not directly accessible. Provided we have an ssh account to the firewall, we can connect to it and make a tcp local forward to gain access to the web server on the LAN web server. Let's see how.
The code
First please download Jsch from Jcraft, and put it in your classpath.
Below is a simple, basic but working class, useful to explain the basics of tunneling thru Jsch.
   1:import com.jcraft.jsch.*;
   2:
   3:public class Tunnel {
   4:    public static void main(String[] args){
   5:        Tunnel t=new Tunnel();
   6:        try{
   7:            t.go();
   8:        } catch(Exception ex){
   9:            ex.printStackTrace();
  10:        }
  11:    }
  12:    public void go() throws Exception{
  13:        String host="XXX.XXX.XXX.XXX";
  14:        String user=&qmauot;username";
  15:        String password="password";
  16:        int port=22;
  17:
  18:        int tunnelLocalPort=9080;
  19:        String tunnelRemoteHost="YYY.YYY.YYY.YYY";
  20:        int tunnelRemotePort=80;
  21:
  22:        JSch jsch=new JSch();
  23:        Session session=jsch.getSession(user, host, port);
  24:        session.setPassword(password);
  25:        localUserInfo lui=new localUserInfo();
  26:        session.setUserInfo(lui);
  27:        session.connect();
  28:        session.setPortForwardingL(tunnelLocalPort,tunnelRemoteHost,tunnelRemotePort);
  29:        System.out.println("Connected");
  30:
  31:    }
  32:
  33:  class localUserInfo implements UserInfo{
  34:    String passwd;
  35:    public String getPassword(){ return passwd; }
  36:    public boolean promptYesNo(String str){return true;}
  37:    public String getPassphrase(){ return null; }
  38:    public boolean promptPassphrase(String message){return true; }
  39:    public boolean promptPassword(String message){return true;}
  40:    public void showMessage(String message){}
  41:  }
  42:}
Let's focus on the "go" method. On line 22 we instantiate a Jsch object, which is the core of the library. We then use it as a factory to get a Session (line 23), to which we pass the user name, the host address and the port. In our case, the host is the firewall and the port is 22 (ssh).
On line 24 we set the password for the user on the firewall. Let's ignore for the moment lines 25 and 26 (we'll talk about them in a minute).
On line 27 we connect to the remote host(the firewall), but the "magic" is on line 28. What we make with the method "setPortForwardingL" is telling our open session that any data sent to port "tunnelLocalPort" of our machine (localhost, to be clear) should be forwarded to port "tunnelRemotePort" of the machine with address "tunnelRemoteHost" located behind the firewall, and viceversa. This way, with the values used in the code above (remember to substitute the IP addresses and the tcp ports to match your situation), if on my browser I write "http://127.0.0.1:9080" , I'll see the home page of the webserver active on port 80 of the machine with IP address YYY.YYY.YYY.YYY located behind the firewall.
Now the lines we left behind (25 and 26). These refer to the inner class defined in our code, "localUserInfo". It implements UserInfo, and works as an utility used for authenticating on the proxy machine (the firewall in our case). The interesting overridden methods are:
- promptPassword - here we can put code needed to input a password. In our case we've already set the password with "session.setPassword", otherwise we should have set it here. In graphical applications we could have shown a dialog with a text field, in a console application we could have prompted it on the standard input.
- showMessage - This will be called by jsch whenever something happens during connection/authentication. It's a developer's task the showing of the passed message, thru a simple System.out.println,a dialog box or whatever.
- promptYesNo - this is called by Jsch, with a message attached if confirmation of something is needed (tipically acceptance of connection to an unknown host). Here we return true (otherwise the connection is rejected, but again, you could implement a yes/no dialog box to ask for confirmation).
This said, line 25 instantiates our inner class, while line 26 makes our session use the created instance of "localUserInfo" to manage the authentication process.
We've just seen the simplest possible scenario, but using Jsch it is possible to do some really interesting things. For example, I use it to locally mount filesystems located behind a firewall. It's not difficult: - Make a local forwarding of your 2022(any free port will be just fine) to port 22 of your protected resource
- Do a shfsmount of it using as host 127.0.0.1 and port 2022
Hasta la proxima.
|
