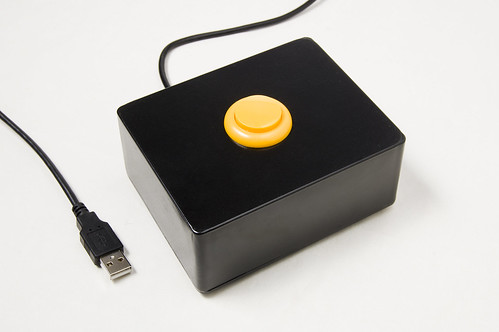
I was in need of a button, but not just any button. A USB-enabled button that could emulate a single key being pressed on a keyboard. This is that button…
It consists of the following materials:
- Teensy
- Mammoth Electronics Die Cast Aluminum Enclosure (4S1590BBT)
- Yellow Push Button (33mm)
- USB A to mini-B Cable
- Rubber Feet

I used a Teensy as it’s a very simple (and cheap!) way to emulate a USB HID. I do wish the Teensy had mounting holes. I ended up not mounting it at all and letting it just hang loose, which should be fine, as it’s so lightweight. There’s a bit of electrical tape wrapped around the Teensy and the solder joints.
For the box, I wanted something metal, so it would be heavier and more sturdy than the typical plastic project box. Matt Gauger of Milwaukee Makerspace suggested I check out Mammoth Electronics, as they make boxes for guitar pedals. I ended up choosing their “tall” enclosure.
For the button, I really like this button over the one I ended up using, but it was too tall to fit in the project box. Unless you’re a “button snob” you probably won’t notice much difference between the two.
If you’ve got USB cables lying around, use one… otherwise, you can get one from Monoprice for less than a dollar. I pretty much buy all my cables from Monoprice.
As for the rubber feet, I picked some up at the local hardware store… as well as some black spray paint. (Note: If you are ordering the button from Sparkfun, just get the rubber feet from them too!)

There was one more item I needed. The button needs a 27.3 mm hole to fit into, which means I needed a hole that was 1.07480315 inches wide. Well, 1.07480315 inches is pretty close to 1.0 inches, so I ended up getting an Ace Bi-Metal Variable Pitch Hole Saw. (The link is not the exact one that I got. I ended up getting mine at the local Ace Hardware store.)
As for the process, the Teensy part took a small amount of time, (see the AWESOME Button) and the drilling was a little tricky, as the 1.0 inch hole was just slightly too small. A bit of creative drilling with a regular drill bit fixed that though. The spray painting was the real time consuming part of it all. As for the assembly, I originally envisioned mounting the Teensy on the bottom plate of the box, and having a hole where the USB connector would be accessible, but I ended up going with what you see in the photo. (I just used the Dremel to cut a small groove for the cable to fit into.)
And why do I need a yellow button that can emulate a key being pressed? Well, sometimes you just need a yellow button that can emulate a key being pressed…

Note: A number of people have asked for the code I used, and even though it is in the comments, I thought I should post it in here as well.
/*
 * Button.pde
 */

void setup() {
  Serial.begin(9600);
  pinMode(10, INPUT_PULLUP);
  delay(500);
}

void loop() {
  if (digitalRead(10) == HIGH) {
    delay(10);
  } else {
    Keyboard.print(" "); // we print a space
    delay(1000);
  }
  delay(10);
}
67 replies on “The Button”
CCCKC would like to use this for a photobooth at Maker Faire Kansas City! I have the parts but really have no idea to code this, any help would be appreciated.
Luis, I’ve added the code to the post. (See above.)
I used the Arduino IDE with the Teensyduino add-on.
If you get stuck, let me know and I’ll see what I can do to help.
I was really hoping to get out to Maker Faire Kansas City this year, but it don’t think funding for the adventure will come through… :/
Great walk-thru!
Question – I do not have any experience with putting this type of button together. Can you elaborate which wires should connect to which contacts and I think I can fumble through the rest.
Thanks!
Cameron, if you haven’t watched this video yet, see if it answers your questions, if not, come on back and I’ll see if I can help.
Please correct me if I’m wrong. Using the code above I think you can just use two wires one being connected to the 10 contact (C7) and the other one to the GND contact. I just loaded the code onto my Teensy and used the same button and it worked for me. I think that INPUT_PULLUP replaces the need to put a resistor on the wire. Hope that helps. I’ve only been playing around with the Teensy for about 2 hours now, so I’m far from an expert.
Yup, that should do it. Mine uses a resistor, but it probably doesn’t even need to be there. If you’ve tested it and it works, you should be good to go!
Helped a lot. Question: I saw him plug the usb controller into a white board, can I load code without doing that?
bootloader with the reset button. Just did some more reading. =)
Yeah, the white board is just a breadboard for prototyping, you don’t need it if you know what you are doing.
Making progress eh? :)
Nice work… clean, simple and classy. I like it.
I’ve been thinking about doing something like this for a friend’s upcoming wedding. As I was intending to build in a Linux laptop, that means using an external display and the “Cheese [Booth]” application http://projects.gnome.org/cheese/
For a wireless picture button, folks could use a JeeNode (a barebones 3v Arduino which comes with a 433/915MHz RF transceiver). I’d have a backup plan of using USB wire though… the Jee radio (a RF12 you can get at Sparkfun also) is reliable but 100 bystanders with cellphones might do who knows what to the signal. It will run for months on a pair of AA’s.
Admittedly, the Cheese app (at this time) has no printing capability and I had not thought of that… was just going to route the photos to a Flickr account. Hmm..
This is exactly what I was looking for! I am building a photo booth for a friends wedding and was looking for a way other than just having a keyboard. I just ordered all the parts and hope to start putting it together soon. I may have questions but looks pretty self explanatory so far.
one question.. do the wires come with the teensy?
thanks for putting all this info up here! :)
shc, No wires come with the Teensy. Maybe if you ask nicely when you order your Teensy, they can throw in some scrap. :)
Alternately, you can get some from Radio Shack, or out of an old broken computer, appliance, etc.
Let me know if you need any help once you start putting it all together.
Thanks for all the help Pete. I just got my teensy in the mail, downloaded the proper softwares and loaded the “space” code first try, no issues. Now I need my arcade button to arrive and I’m set to test and complete my project. Thanks again.
I got the teensy board today and am playing around with it but cant get it to work right.
I have everything installed that I need( I think)
I am running arduino 0022 with teensyduino installed
I have Teensy Loader running
I copy the code above into arduino and click verify. It pushes the code to Teensy Loader and then reboots.
That seems like it should work but everytime I press the button Teensy Loader erases and re programs
I feel im almost there but am missing a step.. any ideas? thanks for the help!
shc, what button are you pressing? The button on the Teensy? A button you wired up? A button in the software interface?
hello
I m beginer using arduino “uno” and I have one.
Can yon tell me if I can build the botton with the arduino UNO?
thank you
When I try to upload into the arduino uno, I have errors…
thank you
gael, The Arduino UNO can’t (easily/fully) function like a USB HID device, so it can’t really act like a space bar. You’d need to do a lot of extra work to make it do what the Teensy does. Honestly, the Teensy is the perfect device to use for this, and the Arduino will probably just add a later of complexity, which, for a beginner, is probably something you don’t need.
One thing that always gets me (today is the second time I’m making a button like this, this time for use as a remote go button for Qlab) is when you put the code in and hit verify, and it says something like xxxx was not declared. I figured it out the first time, and had to re-learn it the second time, so I’m posting it here… possibly only for myself on the third time around.
In Arduino 0022, go to Tools. Under “Board”, choose “Teensy 2.0” (or whatever board you’ve got). Under “USB Type”, choose “Keyboard + Mouse.” After this, the code will verify and load properly. I know this is probably pretty basic if you’ve used Arduino before, but it’s the basics that get lost sometimes when explaining things to others.
Anyway, thanks very much, Pete. My wedding photobooth benefits very much from this, and now I’m using it in my professional life as well. Great post, great project, great job.
Dave, right you are… thanks for the comment! It’s the sort of thing you tend to forget, especially if you stumble upon it the first time and don’t specifically make a note of it. :)
Would it be possible to setup multiple buttons (say 5-10) on an enclosure using the Teensy? It looks like it has enough I/O pads, but I just don’t have the experience with microcontrollers to know.
AaronGNP, Sure! I’m building one now with 2 buttons. For more buttons, you could do it the “simple way” with a Teensy, which has 25 I/O pins (or use the Teensy++ which has 46 I/O pins) and just connect one button to each pin. Alternately, I’m sure there’s some more advanced way to do it, but I’d need to hit up the experts at Milwaukee Makerspace to figure it out. :)
Just purchased spark booth and created my button with the tutorial above. Thanks! The teensy board is pretty awesome. For those of you than want a little more customization, I created the code to have 1 button but setting it up with 2 different actions. Press the button to start taking photos and then pressing and holding the button to send another keyboard command, for example: cancel.
#define buttonPin 10 // analog input pin to use as a digital input#define debounce 20 // ms debounce period to prevent flickering when pressing or releasing the button
#define holdTime 1500 // ms hold period: how long to wait for press+hold event
// Button variables
int buttonVal = 0; // value read from button
int buttonLast = 0; // buffered value of the button's previous state
long btnDnTime; // time the button was pressed down
long btnUpTime; // time the button was released
boolean ignoreUp = false; // whether to ignore the button release because the click+hold was triggered
//=================================================
void setup()
{
// Set button input pin
pinMode(buttonPin, INPUT);
digitalWrite(buttonPin, HIGH );
// Set LED output pins
}
//=================================================
void loop()
{
// Read the state of the button
buttonVal = digitalRead(buttonPin);
// Test for button pressed and store the down time
if (buttonVal == LOW && buttonLast == HIGH && (millis() - btnUpTime) > long(debounce))
{
btnDnTime = millis();
}
// Test for button release and store the up time
if (buttonVal == HIGH && buttonLast == LOW && (millis() - btnDnTime) > long(debounce))
{
if (ignoreUp == false) event1();
else ignoreUp = false;
btnUpTime = millis();
}
// Test for button held down for longer than the hold time
if (buttonVal == LOW && (millis() - btnDnTime) > long(holdTime))
{
event2();
ignoreUp = true;
btnDnTime = millis();
}
buttonLast = buttonVal;
}
//=================================================
// Events to trigger by click and press+hold
void event1()
{
Keyboard.print(" "); // pressed once
delay(1000);
}
void event2()
{
Keyboard.set_key1(KEY_ESC);
Keyboard.send_now();
Keyboard.set_key1(0);
Keyboard.send_now();
delay(1000);
}
Pete & AaronGNP –
I am in the process of building a multi-button myself. I am having issues with both the wiring and the coding.
Would it be safe to say that when wiring a multi button my wiring should be as follows:
ButtonA = wired to I/O 21 + GROUND
ButtonB = wired to I/O 20 + GROUND
ETC
Also, I have used Pete’s original code from his single button but I am having trouble with the code when I try to add a second, third, etc button.
HELP PLEASE!
Nick, that should work for multiple buttons. If I get some time I can try to wire one up and see if I hit any problems.
Pete –
I was reading on the Arduino Forum last night and someone mentioned wiring push buttons like this:
ButtonA = 1pin of the button to 5V, 1pin of the button to I/O pin + lead with a resistor (10K) to GROUND
Repeat for all buttons.
Thoughts?
Nick, for the Teensy you shouldn’t need a resistor if you use the built-in one by declaring INPUT_PULLUP in the code.
The photo in this post may be confusing. This one might be more clear: http://rasterweb.net/raster/2011/06/27/another-button/
Pete –
Thanks for all the help! I was able to get my Teensy board and switches wired this morning as well as my code!
Now I am just awaiting some Hammond enclosures to come in the mail and i will have a completed project!
Thanks again!
Nick, glad to hear it! Would love to see a photo and/or write-up of the final product.
I got the teensy board yesterday and I played around with it for 4 hours but cant get it to work right.
I think I have everything installed that I need.
I am running arduino 0022 with teensyduino installed
I have Teensy Loader running
I copy the code above into arduino and click verify. It pushes the code to Teensy Loader and then reboots.
That seems like it should work but everytime I press the button on the Teensy, Teensy Loader keeps rebooting everytime I press the teensy button.
I feel im almost there but am missing a step.. any ideas? also after i think i load it and connect all the wire (without soldering) the button still does not work. I have watched the video’s over and over again and still can not figure it out 4 hours later. please help!
Are you pressing the small button located on the Teensy board? That will cause it to reset. Have you tried a simple script that just sends data to the serial monitor?
well I imported what you put up top. But im thinking I should not push the button on the teensy after uploading. do you think that is what the problem is?bc pushing the button just resets it…..? also it says 12% used. Can i erase whatever i put on it before and just load the top code you posted? I dont even remember what i put on it bc i was so frustrated lol. Thanks for your help pete!
oh and yes i was pushing the small button
Tracy, did you wire up a button as shown in this photo? http://www.flickr.com/photos/raster/5879164999/ It should connect between ground and pin 10.
(Pressing the small button on the Teensy just resets it, and won’t be useful for anything else.)
Thank you pete I am going to try it after work today! Your the best!
could you provide a code sample for multi-button?
Hi folks, I have zero knowledge about coding and wiring. I’m looking for a step to step guide about the wiring and coding. I want to see how to make a push button and send a “F4” key press to the computer.
i know there is a product selling in the Amazon, however, it doesn’t looks nice. http://www.amazon.com/lmt-USBSTEALTH-USB-Stealth-Switch/dp/B000BKQBIO
I watched the awesome button video clip from Matt Richardson couple times and i want to find out the push button switch have to connect to the GND and B0 on Teensy board? how about resistor ? i’m going make a staples button like Matt. Also,i have no idea about coding too.. is that any nice guy can do the simple step by step guide for me?
Hi everyone…
Like most of you, i am working on trying to get to this to work with sparkbooth. I successfully got the teensy to work by sending the “space bar” but now i want to add a couple of extra buttons to assist in reprinting a photo and/or changing the color…
I know that i need to send CTRL+P and CTRL+K… i see that there are a couple of people that got it working. Any chances on sharing your code and pin layout?
Sunny, it’s been on my TO DO list to make a more complete tutorial… I’ll see if I can get some free time to do so.
Lou, it should be pretty trivial to add more buttons and modify the code to send other responses. Where are you having issues?
Hello. I have a button like this that I made for my wedding, that I am now selling on Etsy. It’s a large red button that glows when plugged into the USB port. It’s in a nice die cast aluminum case which can be painted if you like. I just used it as is for a more industrial look. I can also custom make buttons like this in any color if you like. Just send me a message on Etsy. Check out thegarage.etsy.com for more info. Thanks very much!
Hi everyone – thought I’d contribute.. I programed my Teensy with two arcade buttons. A Yellow to start the session and a black to change the color mode. Feel free to contact me @ szm218@gmail.com – Here is the code:
void setup() {
Serial.begin(9600);
pinMode(1, INPUT_PULLUP);
pinMode(10, INPUT_PULLUP);
delay(4000);
}
void loop() {
if (digitalRead(10) == HIGH) {
delay(10);
} else {
Keyboard.print(” “); // Yellow or Start the Shot’s.
delay(500);
}
if (digitalRead(1) == HIGH) {
delay(10);
} else {
Keyboard.set_modifier(MODIFIERKEY_CTRL);
Keyboard.send_now();
Keyboard.set_key1(KEY_K);
Keyboard.send_now();
Keyboard.set_modifier(0);
Keyboard.set_key1(0);
Keyboard.send_now();
delay(500);
}
delay(10);
}
Does your button work with PSRemote from Breeze Systems? Looks like a very inexpensive way to star the process, versus the other button they feature and the deadman switch they advertise.
Thanks.
Dick, I’ve never used PSRemote, but the button can emulate most keypresses, so if it can be done that way, it would probably work: https://www.pjrc.com/teensy/td_keyboard.html
Hi Pete,
Very nice website you have, very inspiring.
I am getting all kind of ideas, visiting this site.
But I am kinda new to electronics and programming.
And I was trying to create a teamspeak button. In case you do not know, teamspeak is a sort of skype, teamspeak is used a lot in the gamers scene.
I was trying to recreate the button from this website; http://www.patricknorton.me/?p=33
Ordered that awesome foot pedal and two teensy’s. :) (the food pedal is awesome)
And I think I am having problems with the code.
I think it does his job, but I need to alter it for my needs.
Because in this way, the code is useless for me.
Like I said before, I am new to coding, since yesterday and today, I’ve learned a lot, I don’t want to be lazy. And I tried out a lot with altering and playing around with the code.
But I can’t change the code to my needs :(
Here is the original code:
____________________
void setup() {
Serial.begin(9600);
pinMode(10, INPUT_PULLUP);
delay(4000);
}
void loop() {
if (digitalRead(10) == HIGH) {
Keyboard.set_modifier(0); // clear keypress
delay(10);
} else {
Keyboard.set_modifier(MODIFIERKEY_CTRL); // hold control key down
Keyboard.send_now();
}
delay(10);
}
_______
On the switch I got the – connected to ground and the + to pin 10
Like I said the code is working, but when I connect the whole thing, the ctrl button is pressed, the whole time, even after releasing the button.
I need to push the button,-talk- and when I release the button (the foot pedal) it should stop “typing” the specified key. Now its typing (holding) ctrl the whole time. Funny and annoying at the same time. (In the program teamspeak I can define the button (CTRL) to push for talking, so of course that doesn’t have to be in this code)
And I would like to change the ctrl button to the home key, that is a key that never get used in games, so thats why.
I found out that the key code for the Home key is KEY_HOME but when I try to alter it, it say something like it is not defined, sigh. And when i try it in an other way the letters are not turning blue.
I read a lot of codes, on this website and other websites, I alter a lot of codes, but can’t get that thing to work.
I also tried to switch bits of the code so that the hold ctrl key down stood before clear key press.
Did manage to recreate the awesome button tough :D (from the make site) http://blog.makezine.com/archive/2011/04/the-awesome-button.html
I think with a little knowledge it is very easy to alter the code to my needs, but there is no tutorial which explains how to do this.
So to summarize:
-the ctrl button must be released when I don’t operate the button
-the ctrl button must be set to the home key.
Thank you so much! in advance.
Patrick
The Netherlands
p.s. I copied your code Pete and it was working, it was printing spaces, great! that photo booth is such an original idea!
p.p.s. I also changed polarity, of course that wouldn’t work, but I thought you never know. (GND and 10 )
p.p.p.s. I am gonna turn my leds on that i programmed to turn on and off, just to relax…. lol
oh and before I forget, my whole keyboard is losing his function, when I plug in the whole thing.
It only goes back to work when I unplug and press ctrl on the keyboard…(all tough I can use all ctrl functions like copy and paste and search and all other ctrl shortkeys)
Maybe anchor the Teensy with a bit of Sugru?
Hey Patrick.
Try this code. It’s from my Qlab remote control that I made using a Teensy. If you change ESC to HOME, you should be able to use the home key. Happy coding.
_______________________________
void setup() {
Serial.begin(9600);
pinMode(10, INPUT_PULLUP);
delay(4000);
}
if (digitalRead(10) == HIGH) {
delay(10);
} else {
Keyboard.set_key1(KEY_ESC);
Keyboard.send_now(); // hit escape (STOP ALL)
delay(10);
Keyboard.set_key1(0);
delay(10);
}
Patrick, it almost sounds like the button is being pressed all the time. Are you sure the button you have works properly and nothing is shorting it out? (Which would cause it to be “on” all the time.)
Hi,
Thank you very much all, for your comments and tips. I tried the code, and after a little altering it in the syntax, i got the code to work.
But again the same problem, the esc key was pressed all the time.
I just measured the switch with my Ohm meter, and it is working perfect, no leaks or anything. (when I connect the two wires I made on the switch with my Ohm meter, it says 1 ohm, when I operate the button, it says something like 0.01, so that is working)
Then there is only one solution, that is what Pete told me, and that is there is some shorting somewhere in the Teensy board. I even tried different pins, (of course I adjust the code to the right pin) and the same result.
Ahum,…. I did create a little smoke a couple of days ago.
When the 10 and the grnd was accidentally touching each other…….
After that it worked just fine, so I thought wow I am lucky, after three times shorting, it still works. (the 3rd time the current was going true my fingers, wow that gets hot ! )
So after all this, there is only one conclusion.
If you guys would allow me just to speak a few words about my Teensy,
Teensy in the short time that I knew you we had so much fun together, you let my Leds blink.
I hope you are happy right now in scrapheap heaven.
So I think there is no more hope, not even with Sugru.
But, I will be persistent, so I will order soon a new Teensy and this time I will also order one with pins for making it on my breadboard, that way I have less chance to short things.
Thank you guys again!!!
To be continued,
(I hope you don’t hate cliffhangers)
Can you post the code for the teensy?
Jim, the code was in comment #2, but I’ve not added it to the main post as well.
Pete-
Hello… I am a Sparkbooth user and want to use your button to start the photo process. I saw a reference to the “Awesome Button”, so I checked out the video on how Matt Richardson used the “Easy” button. Since I want to use the “Easy” button I followed Matt’s instruction, but I used your code. I wired a ground from one side of the “Easy” button to the ground on the teensy board and wired another wire from the other side of the “Easy” button to the B0. I tried the button, but it did not work. I noticed you wired yours with a resistor and terminated 3 wires to C7, VCC, and GNB. I noticed that Matt’s code called out:
“pinMode(0, INPUT_PULLUP)”
and
“if (digitalRead(0) == HIGH)”
whereas yours was
“pinMode(10, INPUT_PULLUP)”
and
“if (digitalRead(10) == HIGH)”
So instead of changing my wiring from Matt’s wiring to yours, I changed a portion of your code to incorporate Matt’s. The button seems to be working. However, (as you can probably already tell) I am clueless with coding and electronics.
My full code is
void setup() {
Serial.begin(9600);
pinMode(0, INPUT_PULLUP);
delay(4000);
}
void loop() {
if (digitalRead(10) == HIGH) {
delay(0);
} else {
Keyboard.print(” “); // we print a space
delay(1000);
}
delay(10);
}
I want to make sure this code is appropriate. I am trying to minimize having any problems in the future. I would really appreciate it if you could review the code I used based upon the wiring directions I followed (from Matt) to see if you have any recommendations for improvements.
Thanks,
Rob Smith
Rob, Matt used pin 0 and I used pin 10. You just need to make sure your code is looking for the pin you connected the wire to. (Make sense?)
Thanks for the feedback. Take care.
I programmed the “BlinkWithoutDelay” sample script (that comes with Arduino) onto my Tinsy, so I know that works fine. I was able to change the time interval in the code and see the correct result on Tinsy, so I was able to understand how to re-program the Tinsy (using “Program” and “Reboot”) using the Tinsy Loader.
My issues is — I want to use your 19 lines of code (above) to simulate someone pressing the space bar on the keyboard, but I’m not sure how to test it out. I don’t have the spark-photo software on this computer just yet. I don’t have a breadboard to test out. I don’t have any wires soldered to it yet. I just have the Tinsy connected to the USB connected to the PC.
Just like how I saw with the LED blinking, I would like to see an actual space bring printed out to my screen, let’s say on Notepad. How do I do that?
Mike, you can carefully short the contacts of C7 and ground with a bit of wire or a paperclip while watching the cursor in notepad and you should see the space printed.
I’m making a Photo booth. I have a Mac similar to the one pictured. What webcam and type of lighting did you use?
Edith, see this post for info on the camera:
http://rasterweb.net/raster/2011/05/19/the-photo-booth/
And as for the lighting, I used a small clamp-light from IKEA.
I was wondering if using the button in this capacity (photobooth/spacebar) does the device provide power to the switch? In other words, if I use a lighted button, will it light up?
Jason, you could use a lighted button, as long as it worked with the supplied voltage, and you had code to handle turning on the light in the button. Right now the code I have (which is a bit newer than what is posted above) lights up the built-in LED on the Teensy. I’ve been meaning to incorporate a lighted button, so maybe now’s the time to experiment with that.
Hi Pete,
I am very interested in making a Sparkbooth powered Photo Booth for my wedding. I’m not very familiar with programming so would be a bit reluctant to try the Teensy.
Would I be able to hack an old usb mouse and wire the switch to that to provide the same functionality?
Brian, If you’ve got a programmable mouse it may be possible to set it up to output a key press when you click the button, but I’ve never done it, so I’m mostly guessing.
If you’re not comfortable with programming a Teensy, but feel like still half way building your own, we now have The (Bare) Button available: http://store.2xlnetworks.com/thebarebutton/
Maybe it’s a new feature of Sparkbooth but you can activate the timer using a mouse click now rather than having to press the spacebar. So im looking to wire the Big Red Button (http://www.sparkfun.com/products/9181) up to the mouse and hopefully it works!
Ahhh, well hey, that might just work then! Does it matter where on the screen the mouse pointer is? I’ll have to look into it.
I dont know if the cursor has to be in a particular position. In Sparkbooth 3 under User Controls, you just have to check “Enable click or touch to start” and when you click the mouse, the countdown starts.
Hi, I used your code and it works great. But I would like to add a second button that acts as a ESC-keystroke. Unfortunately, I’m a complete idiot when it comes to coding. Could you please givbe me a hint what i have to modify to use a second button on pin 9 for example?
THX!
Basti, this code is very simplistic, and is sort of optimized for one button. I’ll dig up some multi-button code that may work, though for now I do have this example (which is probably way too complicated!) https://github.com/raster/CNC-Router-Controller