[Update (december 2011): the blog post below was initially written in january 2010. I guess it can still be quite useful to complete beginners or people who have a not-so-recent Mac, but please note the following. First, the new version 10.7 of Mac OS X called Lion has been released in july 2011, and can be bought and downloaded in the App Store for $29.99 if you have the latest Snow Leopard . Second, a new generation of Xcode, which runs only on Lion has been released, called X code 4. As I write it is Xcode 4.2.1 and it can be downloaded for free from the App Store. It is only with the Xcode 4 generation that you can developp Apps for iPad and iPhone: have a look at the iOS dev center, while if you want to developp stuff for Mac you should look at the Mac dev center.]
Introduction: This tutorial has been written for the mathematician who knows very little about programming yet who wishes to use a given source code as a “black-box”, that is to produce an executable program from this code, and run that program on the Mac using one’s own data files.
I have thus made the tutorial a very explicit step-by-step one with screenshots. The aim is to install on a Mac and use the GCC compiler, which allows to create executable programs from a C or C++ source code. (For Windows and linux versions click here).
On a Mac, GCC comes in particular as part of a nice package called Xcode, which is a full IDE (Integrated Development Environment: a software that makes writing and managing code a simpler process). So we shall see in detail how to install Xcode, and will use only a very tiny part of it to compile our source code.
Requirements: you should have a recent Mac (bought after winter 2007, see below) with 3GB of free space at least on your hard-drive (to check that, click on the hard-drive icon and choose “Get info”), and a fast internet connection (broadband, which nowadays is probably a given except in remote countryside locations).
Then two cases: either you still have the DVD that came with your Mac (“Mac OS X Install DVD”). Then I expect the whole installation to take less than 20 minutes. Or, for some reason, you don’t have this DVD with you, then it is explained in every detail below how to download Xcode for free from Apple’s website. In that case, it will take between 1 and 2 hours depending on Apple’s server response, with most of that time consisting in downloading a big file, a time during which you can safely just go away and read a book.
Notations: we shall use the following shorthand notation for particular combinations of keys. First, the modifier keys that we’ll use are: CMD, the command key (here is a picture) ; CTRL, the control key (here is a picture). Now the notation: for example CTRL+V means that while pressing on CTRL you should press on V once, then release both.
Software names are written in italics.
Step 1 (checking your version of OSX): Turn your Mac on. First we need to know which version of Mac’s OSX you have. To do that open the Apple menu (click on the apple at the top left of your screen), then in the scrolling menu choose “About this Mac” . If it says “Version 10.5.x” (where x is some integer, as in 10.5.8) then you have the Leopard version of OSX. If it says “Version 10.6.x” then you have Snow Leopard. Both have been issued after winter 2007, and are the subject of this tutorial. (The older version 10.4.x called Tiger is also ok but significantly different, I’ll try to update the tutorial accordingly later if I can).
Step 2 (getting the Xcode package ready):
– If you have the DVD, insert it, open its “Optional Installs” folder then to the Xcode folder where you should find a file called “Xcode.mpkg” or “Xcode tools.mpkg”, with an icon like this  Now go directly to step 3.
-If you don’t have the DVD, here is how to download Xcode for free. First you need to register, so go here https://connect.apple.com/ and click on the “Join Now” button. It should open a form starting like this: 
Just fill this in, and the next one. In particular “Apple ID” is a username that you create now, not something you already have on a printed document somewhere. Beware that it takes some minutes of loading time between the forms but don’t go away, it’s an https-encrypted transaction with a 15 minutes time-out setup, it’s best to avoid to have to start over again.
Now that you’ve registered there are two cases:
– if you have Snow Leopard then go here https://connect.apple.com/cgi-bin/WebObjects/MemberSite.woa/wa/getSoftware?bundleID=20505 . It will say that you’re about to download Xcode 3.2.1 and will ask for your Apple ID and password. Do this and click to start downloading a big 751MB file called “xcode321_10m2003_developerdvd.dmg” or the like, it is a disk image. Make sure you know where it goes (choose the Desktop for safety), and wait till it’s complete (this takes about an hour and doesn’t need any attention in the meantime).
– if you have Leopard then go here https://connect.apple.com/cgi-bin/WebObjects/MemberSite.woa/wa/getSoftware?bundleID=20414 . It will say that you’re about to download Xcode 3.1.3 and will ask for your Apple ID and password. Do this and click to start downloading a big 995MB file called “xcode313_2736_developerdvd.dmg” or the like, it is a disk image. Make sure you know where it goes (choose the Desktop for safety), and wait till it’s complete (this takes about an hour and doesn’t need any attention in the meantime).
When the download is finished, click (or double-click, depending on your settings) on the icon of that file on your desktop: another icon will appear called “Xcode”. Now click on that one and this will open a window containing a file called “Xcode.mpkg” or “Xcodetools.mpkg”. Here is a screenshot of that situation with the version for Snow Leopard 
and here is one with the version for Leopard
Step 3 (installing Xcode): now click (or double-click) on that “Xcode.mpkg” file. It should start an installation window. So accept the licence and select where to install and what, and confirm: the default choices are fine, it will install in the folder “Developer” the packages “System tools” and “Unix development”. Here’s how it looks (on a french Mac under Leopard)
It will take about 8 minutes to complete (no need to be there during that time). The successful installation will end with a screen showing a big green tick saying so.
When this is done:
– if you come from the DVD route, you can now eject it.
– if you come from the download route, you can close the window containing the .mpkg file, and then right-click (or click) on the “Xcode” icon and choose eject. You can even delete the disk image file .dmg too is you need the space, or store it somewhere.
Note: At this point we have Xcode ready. In particular, it has installed the GCC compiler as a byproduct. So the previous steps have been done once and for all, now let’s see how to make an executable program from a source code, create a data file, and run the program.
Step 4 (launching Xcode):
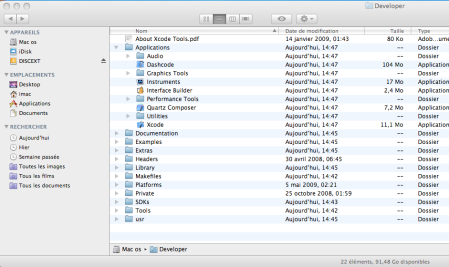
Open Finder (hover the mouse left of the screen and click on the appearing Finder icon). Go to the Developer folder, and open the Applications subfolder. There you see an application called Xcode, here’s a screenshot (click to enlarge):
Click (or double-click) on it, it will launch Xcode (the top-bar menu of your screen now says so) with some welcome screen which you can disregard.
Step 5 (creating a copy of the source code): Now in that top menu choose “File” then “New file” (not “New Project”). It will ask you the kind of file: so if you want to use a source code written in C choose the .c option, if it is written in C++ choose the .cpp one. There is perhaps a box saying “create .h file”, if so unckeck it. Now provide a filename and save in the folder of your choice, let’s say Documents>jackfolder . If it asks “add to project” simply choose “none”. In this tutorial just as an example we’ll use a simple C++ code which is on the polymath5 wiki here, so let’s say we have just created a file called “myprogram.cpp” whose window is open and blank.
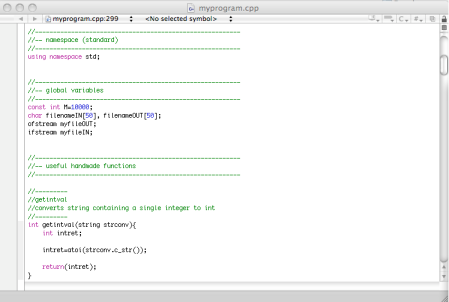
Now we need to copy the source code into this file: go to that wiki page, highlight with the mouse the whole code, then do CMD-C (this copies the text in the buffer), and then click on the “myprogram.cpp” and do CMD-V (this copies the whole code in the file). Now don’t forget to save the file by doing CMD-S. It should look a bit like on this screenshot, in particular notice how some keywords or figures in the code have different colors (click to enlarge):
Step 6 (compiling the source code with GCC): Now let’s create an executable program from that source code.
In Finder go to Applications, then Utilities and launch Terminal. Click on this terminal window and then enter (which means type and press enter) the following:
cd /Users/imac/Documents/jackfolder
(or whatever folder your source is located in). Now for the name of the compiler there are two cases: if your source file is in C you will invoque gcc , while if it is a C++ code you will use g++. In our exemple enter the following:
g++ myprogram.cpp -o xmyprogram
This should normally enfold without any warning, and come back to the prompt. Let’s make sure the program is there, enter:
./xmyprogram
At this point the window should look like this:
If so then everything is working well. Since we don’t have our data file ready yet, and since it’s a good thing to know anyway, let’s terminate this program by doing CTRL-C. It should go back to the prompt.
Step 7 (creating a data file): Sticking with our example, we now must create a text file containing a sequence of + and – separated by one whitespace (including after the last sign). In Finder go to Applications, then Utilities and launch Terminal.
Click on this terminal window and enter (which means type and press enter) the following:
cd /Users/imac/Documents/jackfolder
Now we are in the correct location, so let’s create the data file. Enter:
emacs seq.txt
This creates a blank text file. Now type your sequence of + and – followed by whitespaces. When done, do CTRL-X then CTRL-S (this saves the changes). Now let’s quit this file by doing CTRL-X then CTRL-C. We are thus back to the shell prompt.
Step 8 (running the program for good): In a terminal window enter
./xmyprogram
Then enter the full filename containing you sequence, say
seq.txt
Next give the name or the corresponding HTML file which will contain the tables, say
tab.html
The program will then create that file and go back to the prompt when done. Here’s a screenshot:
It is now possible to open this file in a browser like safari, firefox or chrome.
Step 9 (Creating data file by copy-paste): to produce a text file and paste inside it a long sequence let’s use a graphical editor, go to Finder then Applications then TextEdit. Create a new file, call it “seq” for example and save it as an .rtf file (which is the default). But because this .rtf is not in a plain text file format, you should make some changes: in the top menu bar of TextEdit select “Format” and choose “convert to text”. Now save the file, making sure the “.txt” box is ticked, it should thus save it as “seq.txt” (it will also ask for encoding, the default UTF-8 is just fine). At that point you can safely edit and save your data file, in particular copy a sequence from the wiki CMD-C and paste it to the file CMD-V then make sure the format is ok (no carriage returns, a space after the final sign) and save it with CMD-S.
END OF THE TUTORIAL. New tutorials will be added when I have some time, like basics of C++ and useful scientific libraries, a little shell scripting to run many programs overnight and to process data files, and so on.
Tags: polymath5


September 8, 2010 at 3:57 pm |
Thanks so much!!
September 21, 2010 at 7:58 am |
It was so useful. Thank you very much!
September 22, 2010 at 4:46 am |
You are my hero. I was fumbling around on the internet looking for how to make gcc work on a mac and your blog was the last link I clicked on before I was going to throw in the towel.
The internet needs more fail-proof guides like these. If you wrote a book I’d buy it.
December 5, 2010 at 5:06 pm |
[…] Installing Xcode and using GCC on Mac – episodic thoughts […]
February 16, 2011 at 10:44 pm |
Useful info. Thanks.
March 19, 2011 at 12:49 am |
Echo the above sentiments. Programming on an unknown system can be such a wilderness. Thanks for the help!
June 20, 2011 at 10:44 pm |
thank you
August 9, 2011 at 1:30 am |
Excellent! Thank you!
April 24, 2012 at 5:37 pm |
Thank you *g*
May 21, 2012 at 12:03 pm |
I get the following message in the Terminal:
-bash: g++: command not found
Same thing occur if try to compile a .c file using gcc
If I understand you correctly, the GCC follows by default when Xcode is installed. Why isn’t it found then?!
May 24, 2012 at 8:12 pm |
Sorry for the late reply. I don’t have a mac at hand anymore, but most probably at step 3 you forgot to tick the box for UNIX Developpement Support. Have a look at this page, and do what they recommend depending on which version of Xcode you installed.
February 3, 2013 at 11:51 pm |
Thanks so much! This saved me lots of pointless research.
February 22, 2013 at 3:34 pm |
that was very helpful. I am totally new in programming C/C++ and this got me started! thanks!
September 28, 2013 at 6:31 am |
Thnx a lot
November 24, 2013 at 2:40 am |
Thanks, this article is still very useful. I would have never thought to check my install disk for Xcode. I have leopard still and I don’t have much cash now a days to upgrade OS (I know the price is low for a lot of people but I count my pennies now a days) but I wanted to start coding in C++. Thanks for keeping this on the web.
February 16, 2014 at 8:02 pm |
Thanks Buddy!!!. It Really Works.
February 24, 2014 at 1:36 pm |
Thanks Hommie you saved my day! Keep it up